Many a times, there is a need to notify our customers, with some important update or details. In this tutorial we will look at a hotel booking use case and see how to send an email in Botpress, once after the reservation is succesful. This tutorial is also the most requested tutorials on my website.
For email service we are going to use SendGrid API which is very effective for your production needs. I have been using SendGrid for production email notification and it has been a good experience.
Prerequisites
- Create a SendGrid account.
- Enable Two factor authentication to secure your account.
- Create a SendGrid API key and store it safetly.
- Domain Authenticate [1] – Refer below screenshot
- Single Sender Verification [2] – Refer below screenshot

In the above screenshot verify that both Domain Authentication and Single Sender Verification is verified.
Botpress Workflow
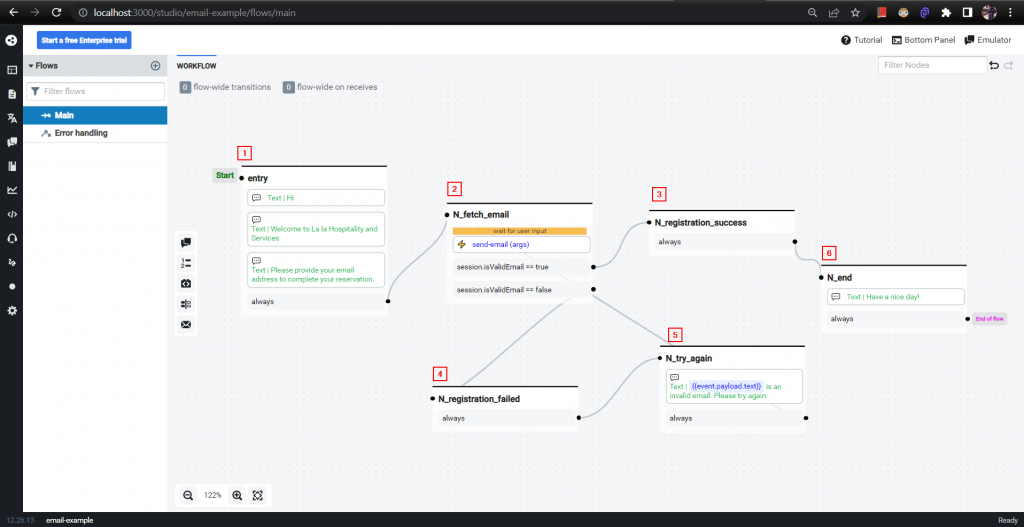
Let us create our Bot’s Workflow. We will create a bot for our imaginary “La la Hospitality & Services”, where users will provide their valid email address to receive Hotel booking confirmation on successfully completing the booking. It is going to be a simple workflow with six nodes.

Below I have described each step of the workflow
- Create an “entry” node, that displays a welcome message.
- Create a “N_fetch_email” node that fetches email address from user and uses a custom action to send an email. Depending on the session’s “isValidEmail” value it will transition to either [3] or [4] node.
- “N_registration_success” is a success node that is reached when we receive a 202 status code from SendGrid API call.
- On any kind of failure, “N_registration_failed” node is called, that always transitions to rety node.
- “N_try_again” is a retry node, that will help to fetch a valid email address.
- Once an email is sent successfully “N_end” is called to end the workflow.
In step [2] we used {{event.payload.text}} to fetch email address from our guest and pass it to our “send-email.js” custom action.
This custom action has 4 responsibilities
- Validate email address.
- Fetch user name for the entered email address.
- Create email template along with PDF attachment
- Send email
require('dotenv').config()
const fs = require('fs')
const path = require('path')
/**
 * Send email using Send grid service
 * @title Send Email
 * @category Utility
 * @author Abhishek Raj SImon
 * @param {string} email - An email address
 */
const myAction = async email => {
  if (email != undefined && validateEmail(email)) {
    session.name = getUserName(email)

    const sgMail = require('@sendgrid/mail')
    sgMail.setApiKey(getSendgridApiKey())

    let data_base64 = base64_encode('hotel_booking.pdf')
    const msg = {
      to: email, //<-  Change to your recipient
      from: 'contact@aabingunz.com', //<-  Change to your verified sender
      subject: 'Your Hotel Booking Voucher',
      text: 'Congratulations! Your booking is confirmed',
      html:
        '<p>Dear ' +
        session.name +
        ',<br/><br/><Strong>Congratulations</strong>! Your Hotel Booking is Confirmed<br/><br/>Booking Reference Number - 123456789<br/>Please collect the invoice at the property.<br/><br/>Please find your Hotel Voucher attached with this email.</p><br/>Thanks & Regards,<br/>Team La la Hospitality & Services',
      attachments: [
        {
          filename: 'hotel_booking',
          content: data_base64,
          type: 'application/pdf',
          disposition: 'attachment'
        }
      ]
    }

    sgMail
      .send(msg)
      .then(response => {
        console.log(response[0])
        if (response[0].statusCode == 202) {
          session.isValidEmail = true
        } else {
          session.isValidEmail = false
        }
        console.log('isValidEmail: ' + session.isValidEmail)
      })
      .catch(error => {
        console.error(error)
        session.isValidEmail = false
      })
  } else {
    session.isValidEmail = false
    console.log('isValidEmail: ' + session.isValidEmail)
  }
}

const getUserName = email => {
  return 'Abhishek Raj' //<- Use a service or database call to fetch username for entered email address
}

const getSendgridApiKey = () => {
  return 'SG.*****' //<- Please use your SendGrid API Key
}

const base64_encode = file => {
  const dirPath = path.join(__dirname, '/')
  console.log('Using attachment from ' + dirPath + file + ' directory')
  var bitmap = fs.readFileSync(dirPath + file)
  return new Buffer(bitmap).toString('base64')
}

const validateEmail = email => {
  return String(email)
    .toLowerCase()
    .match(
      /^(([^<>()[\]\\.,;:\s@"]+(\.[^<>()[\]\\.,;:\s@"]+)*)|(".+"))@((\[[0-9]{1,3}\.[0-9]{1,3}\.[0-9]{1,3}\.[0-9]{1,3}\])|(([a-zA-Z\-0-9]+\.)+[a-zA-Z]{2,}))$/
    )
}

return myAction(args.email)
Note: This email also sends a PDF as an attachment, based on your need you can either use it or remove it.
To keep things simple the PDF attachement is read from the same location as custom action file [1] refer below screenshot.

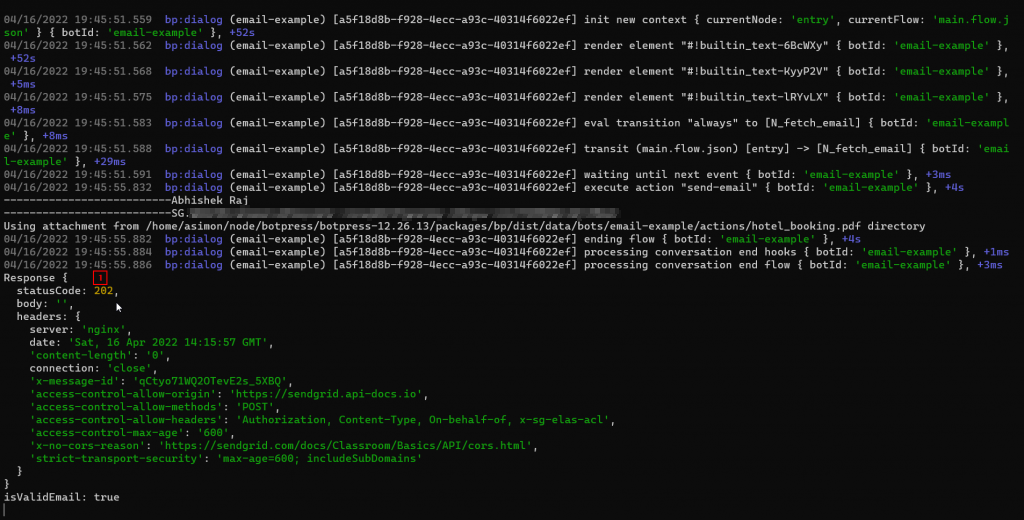
If you use have followed exact steps to create the bot, you will see below output in your Botpress console.

Here [1] shows a status code of 202, which means the email is sent successfully.
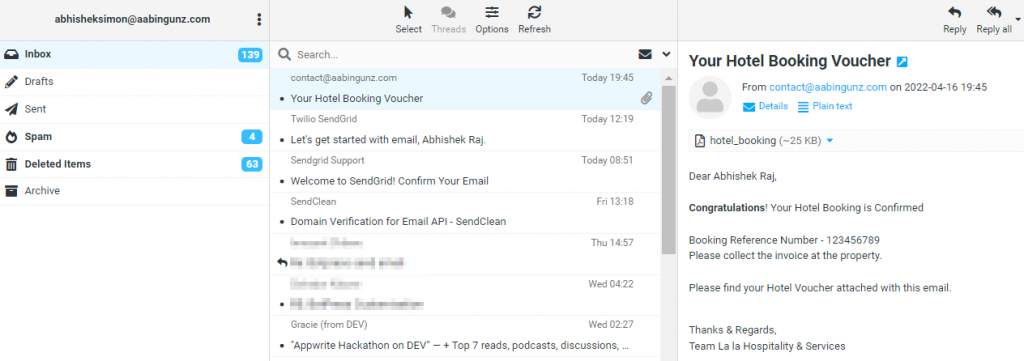
Here is my inbox screenshot.

Hope this tutorial has helped you understand the topic “How to send an email in Botpress?”. Here is the bot export. Let me know in the comments section if you face any difficulty and I will try my best to help you. Also, please support by sharing this to your fellow Botpress developers.


0 Comments