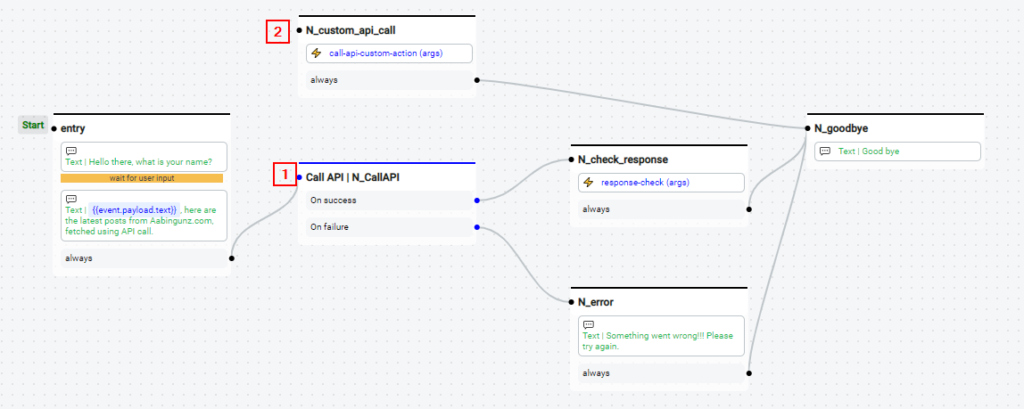
So you are building your own bot, and now you want to add your business logic. This logic might come from one of your REST APIs or databases. Now how to call an API in Botpress? In this post, we will see two ways. First, using the Call API provided by Botpress and custom actions. The below screenshot [1] node uses Botpress Call API and [2] uses custom action to call our API. Let’s get started.

Botpress Call API skill usage
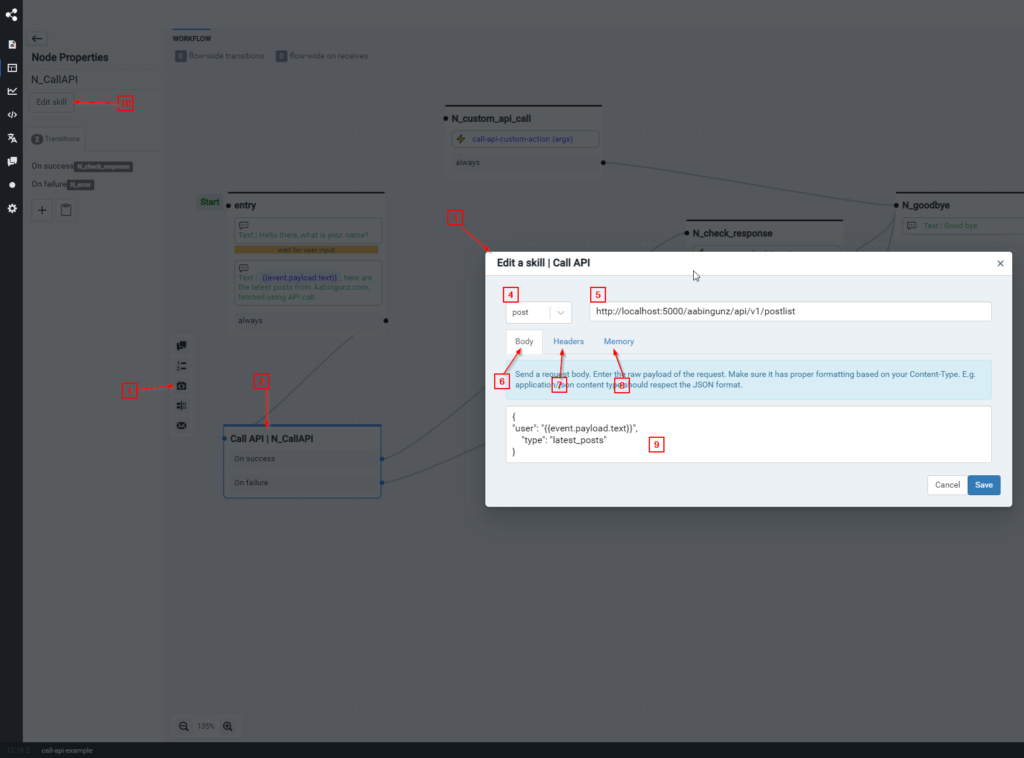
Botpress provides a Call API skill by default. In the below screenshot, we see a bot studio. We will follow the below steps to configure a Call API.
- Click on the symbol pointed by the [1] marker. It will create a node [2].
2. Rename this node as N_CallAPI or anything you can recognize later.
3. Click on this node and click the “Edit skill” button [10].
4. This will open a popup as shown below [3].
5. Here, you can provide the request method [4] and the request URL to your API [5].
6. Since this is a POST call, I will provide a request body [6] required by my REST API.
{
    "user": "{{event.payload.text}}",
    "type": "latest_posts"
}
Note: Here, the REST API residing at localhost:5000/aabingunz/api/v1/postlist accepts and provides data in JSON format.

7. It’s best to use JSON when working with Botpress and API calls. Under the Headers section [7], we will provide content-type and accept as “application/json” type.
{
  "Content-Type": "application/json",
  "Accept": "application/json"
}

8. Under the Memory section, we will save the response using any memory variables. Here I am saving the response in the Session memory variable.

9. We will configure success and failure transition nodes. Here I have selected an always condition for transition on success or failure.

Note: Once a response is received, and if the status code is anything above 400, it will be treated as a failure, and the flow transitions to the failure flow.
10. We will use a custom action to check and process response data. Please check the custom action section for an explanation.
/**
   * A custom action to process the API response
   * Here the API returns below response
   * {"user":"Abhishek","message":"Latest posts on Aabingunz.com, subscribed by Abhishek","data":[{"title":"How to write clean code all the time?"},{"title":"The Essential Chatbot Terminology"},{"title":"How to use values from the database in Botpress?"},{"title":"Botpress tutorial – How to create actions?"}]}
   * @title A custom action to process the API response
   * @category Utility
   * @author Abhishek Raj Simon
   */
  const myAction = async () => {
    bp.logger.debug(`${JSON.stringify(session.response.body)}`)
    let data = session.response.body
    for (let obj of data.data) {
      let payloads = await bp.cms.renderElement('builtin_text', { text: obj.title }, event)
      await bp.events.replyToEvent(event, payloads)
    }
  }

  return myAction()
This is how you can use the already existing Botpress Call API skill.
Botpress Custom Action to call an API
Let’s check an alternate way where you would like to call the API in your custom action programmatically. You can view this tutorial to understand Botpress custom actions and how to create one.
I have created a custom action for this tutorial that does the same job as the Call API skill.
  /**
   * A custom action to call REST APIs
   * @title The title displayed in the flow editor
   * @category Custom
   * @author Abhishek Raj Simon
   */
  const myAction = async () => {
    var axios = require('axios')
    // You can use event.payload.text to get users input
    var data = JSON.stringify({
      user: event.payload.text,
      type: 'latest_posts'
    })

    var config = {
      method: 'post',
      url: 'http://localhost:5000/aabingunz/api/v1/postlist',
      headers: {
        'Accept': 'application/json',
        'Content-Type': 'application/json'
      },
      data: data
    }
    let response = await axios(config)
    for (let obj of response.data.data) {
      let payloads = await bp.cms.renderElement('builtin_text', { text: obj.title }, event)
      await bp.events.replyToEvent(event, payloads)
    }
  }

  return myAction()
The above custom action sends the POST body parameters defined in the data variable and required headers. We use the Axios library to make a rest call, which is available by default in Botpress. Once the data is fetched, we get the below response from our API (same as Call API).
{
    "user": "aabingunz",
    "message": "Latest posts on Aabingunz.com, subscribed by aabingunz",
    "data": [
        {
            "title": "How to write clean code all the time?"
        },
        {
            "title": "The Essential Chatbot Terminology"
        },
        {
            "title": "How to use values from the database in Botpress?"
        },
        {
            "title": "Botpress tutorial – How to create actions?"
        }
    ]
}
In the above response, we are interested in the JSON array’s data part. We will iterate over this array and try to respond with all the latest post titles in our bot. To make our bot reply programmatically, we will use the Botpress SDK method and use builtin_text content type.
let payloads = await bp.cms.renderElement('builtin_text', { text: obj.title }, event)
await bp.events.replyToEvent(event, payloads)
I hope this tutorial on “how to call an API in Botpress” was helpful you can download the bot export from here.


2 Comments
Rezwan Ahmed Refat · October 14, 2021 at 11:26 pm
hello, thanks for the tutorials. I am really struggling to connect my botpress chatbot to the website. my website is running on wordpress and I have followed your tutorial .
Could you please help me? Which plugin should i use to insert the Js code? and what other things should i trouble shoot
Mark · July 7, 2022 at 1:33 am
Well, what a fab tutorial! Being relatively new to Node this really helped me call an API in a function THEN render some buttons, s thank you!